Using LinkedIn Sales Navigator is a very effective way of getting high-quality leads. It’s safe to say that it’s probably one of the best ways of getting leads in 2021. For that reason, we’ll be discussing the ins and outs of the sales navigator in this blog post.
Not only do you need to know what this platform is but you need to know the right way to use it and how to get the best leads to be revealed. We’ll be talking about all of this, and more, so let’s jump right into it.
Getting Started with LinkedIn Sales Navigator
The first thing we need to make clear is that this guide assumes you have access to the LinkedIn Sales Navigator. It isn’t a free platform but you can get a free trial. After your 30-days are up though, you’ll have to pay up.
You can then access the tool by signing into LinkedIn and simply clicking on the Sales Navigator icon at the top-right of your page. That’s it – you’re in and now have access to this extremely powerful tool. If this is new to you then don’t let it overwhelm you. There are a lot of buttons and features but we’re going to show you how easy it actually is.
How to Find Good Leads with Sales Navigator
So the first thing we want to do is find leads. To do this, you need to know your ideal prospect (having a buyer persona can help out with this). If you know who your ideal prospect is you’ll have an easier time getting to them.
Unsure about how to approach this? Our advice is to look at your existing customers and look for commonalities. Take a note of their job titles, industries, skills, and this will be enough for you to figure out who you should be focusing on. For this example, we’ll be trying to get leads with the job title VP of Marketing. We throw that into the search bar and here’s what we get:
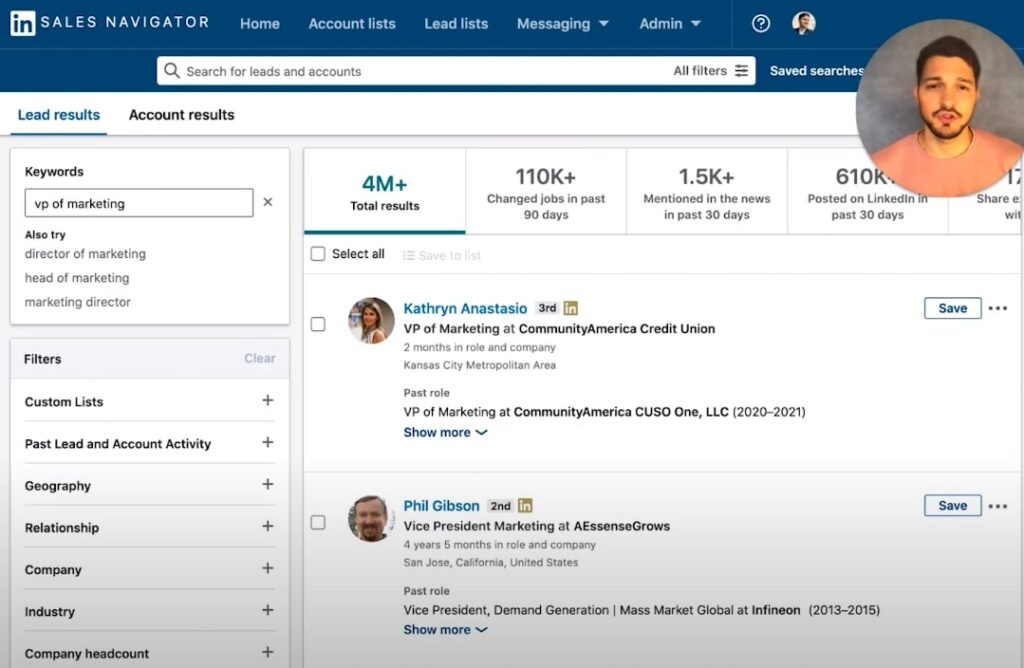
As you can see there’s a lot of useful information here. Most importantly, we can see the total number of users with the job title VP of Marketing. But we can also see how many people changed to that job position in the last 90 days and how many people posted on LinkedIn in the last 30 days (helps us see how many of our results are active users).
This is just our starting point though – obviously targeting 4 million VPs would be ridiculous. We now want to start refining our list down to a more managable size.
Refining the Results Down
The first part of refining your list is to really think about who you’re trying to convert. Sure, we want VPs of Marketing, but where are they located? Which industries do they work in? How big are their companies. These all need to be answered.
So, for our example, we want to target people in the United States. After updating our filters here’s what we have:
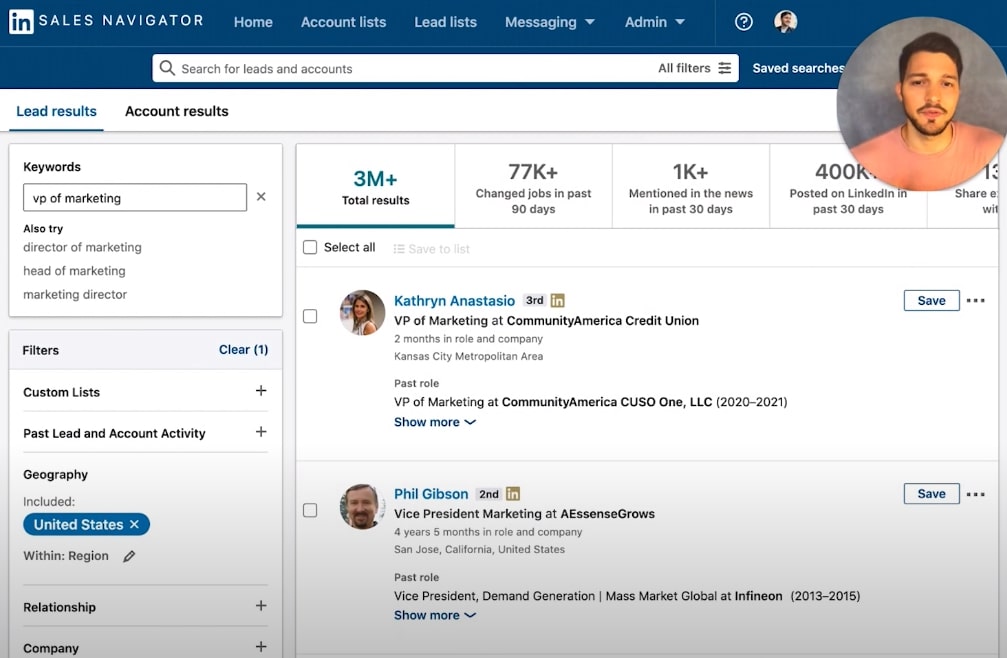
Great – we’re got out results down from 4 million to 3 million. A significant decrease no doubt, but this isn’t nearly close enough to where we need to be. We need to keep refining based on industry, function, job titles, and seniority levels.
Now, although we’re interested in VPs of Marketing, LinkedIn will sometimes throw in similar positions. In particular, we found a few Chief Marketing Officers in our results. Usually this isn’t a big deal but in some cases, you might be after a specific position. So, we’ve gone ahead and added VP to the Seniority Level filter for our search.
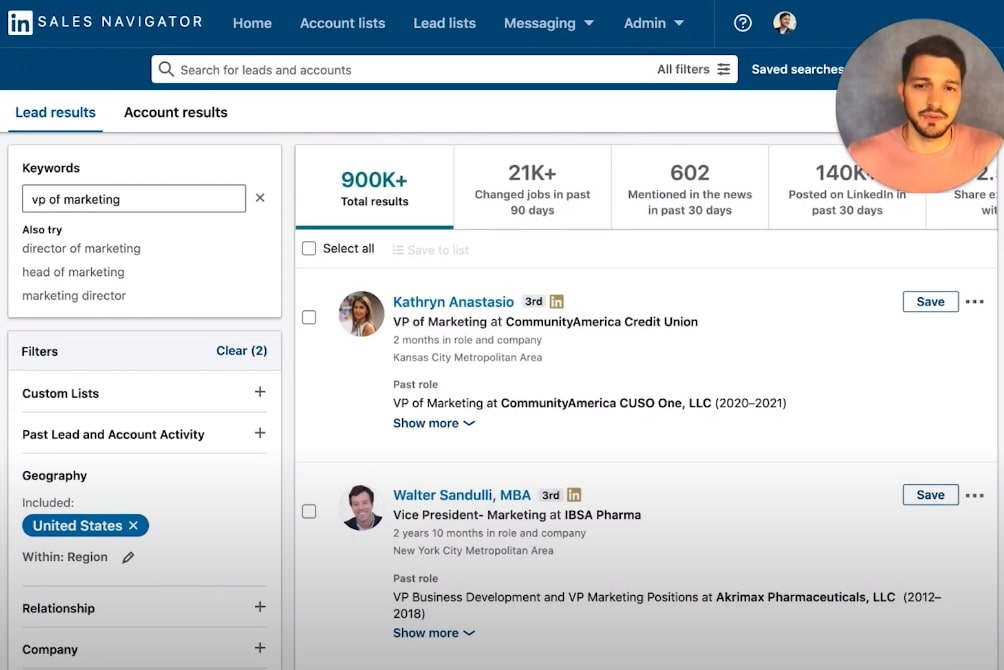
Even though we’re not quite where we want to be – 900 thousand is still a substantial number – you can clearly see that adding this filter has greatly refined our results.
Our next filter would be to add Internet and Computer Software to the Industry filter (this brought us down to 40 thousand, almost there!). If we need to go even further, adding 2nd Degree Connections to the Relationship filter would help reduce the count even more.
Of course, you’re going to be filtering differently depending on your business and who you want to target. However, if you get to this point and still have way too many leads, refine the location. We originally put United States, but it’s more likely that we’d want a specific state. In this case, we might want to get leads from Florida.
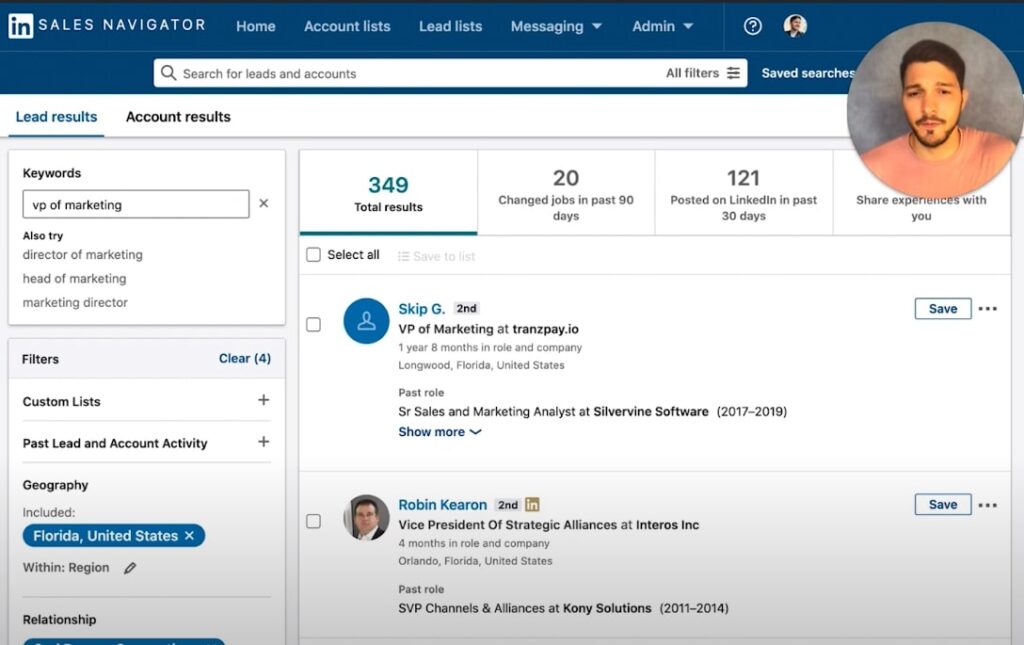
Now we’ve got our LinkedIn Sales Navigator results down to just 349 results. This is the perfect amount for a beginner outreach campaign or a LinkedIn messaging campaign.
What to Do with the Leads
Now that you’ve got the leads from LinkedIn navigator, what’s next? What we like to do is start saving the leads to a list. Just go through each lead and look for the ones you want to target, click Save, and add them to a list that you can use for outreach later.
You might think “I just done all this refining, why am I doing even more?”. You could skip this part and just add every lead to the list, but it gives you the chance to eliminate any leads you think aren’t worthwhile.
The reason you want to have this list is so that you can do your outreach with LinkedIn Sales Navigator for those leads.
Using Lists for Outreach Campaigns
So, now we’ve refined our leads and got a solid list of people we want to reach out to, what’s next? Creating an outreach campaign is the next step.
Once you’ve got at least a few hundred people on your lead list, head over to Lead Lists. You can now start doing either LinkedIn InMail outreach or convert these leads into emails.

If we wanted to do LinkedIn InMail, just click the … symbol and select Message for any lead you want to convert. Sending an InMail message skips the connection request on LinkedIn so you can go straight to their profile.
Unfortunately, there is a limit of how many of these messages you can send, so be aware of that. But it does let you reach out to them straight away and say “Hey, I like your work at X company” or “Hey, we should jump on a call because…”. You can make your case to them now.
This is how you turn a basic lead into a genuine prospect that you can reach out to. There are faster approaches, but this is the simplest way to go about it. Other tools are available on top of the LinkedIn Sales Navigator, but stick to this until you’ve learned the standard method.
How to Refine Your Search (Even Further)
If you aren’t sure who you’re looking for or you just want to see what options are available, we’ve got another method. Next to the search bar there’s an All Filters button. Go ahead and click this and you’ll see the box below appear on the page.
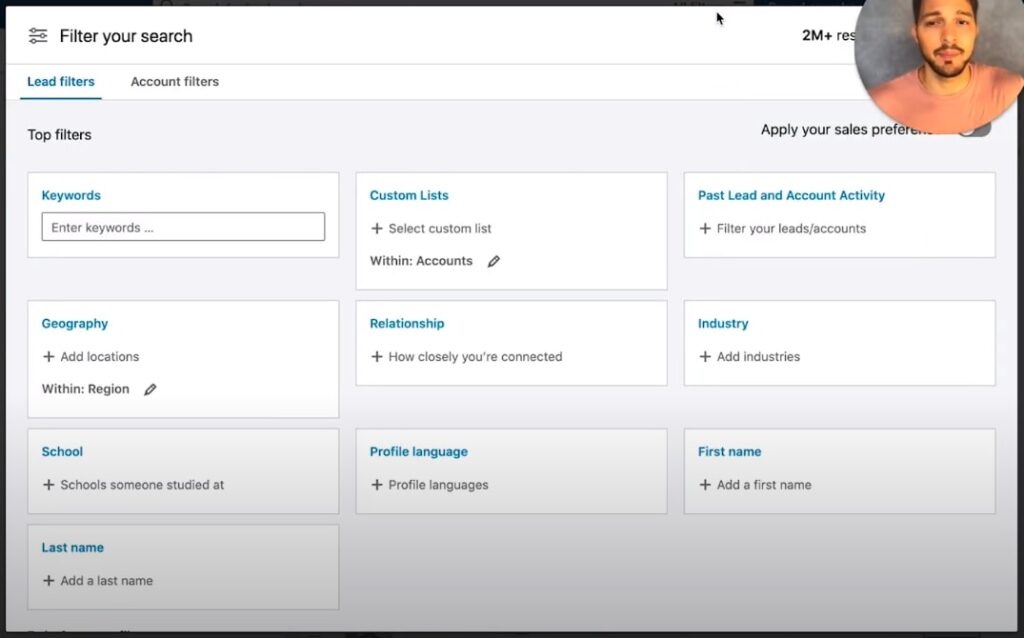
This box shows you all of the possible parameters that you can use when you’re using the sales navigator. You can do it by keyword, past lead, account activity, industry, school, and various other filters.
A lot of the filters are the same as the regular filters menu but there are several extra ones made available here. With this page, it’s also easier to see all of the options you have.
What we like to do is start off by setting an Industry filter and then defining a keyword. Since we may want to target people in SaaS companies, our keyword could be platform.
This way does take some time to get used to and test. You’ll want to AB test to figure out which filters get you the most relevant leads and the All Filters menu is the best way of doing that. It’s worth taking the time to play around here and see just how refined you can get your lead list.
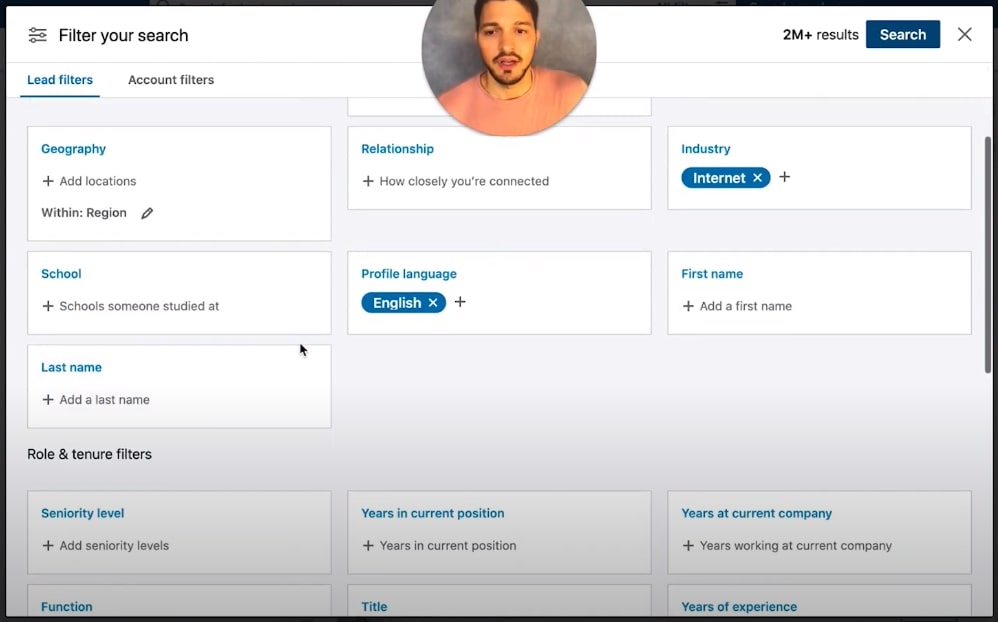
You’ll also notice that as you refine your list, the size of the list changes at the top-right of the window. Keep an eye on this as you update your filters and stop when you get to a reasonable size.
Why You Should Use LinkedIn Sales Navigator This Way
The main reason we’d recommend really refining down your lists, and making multiple lists, is so that you can do:
- AB testing (or split testing)
- Cold outreach
- Other tools in tandem with the LinkedIn navigator
…all at the same time. It’s advantageous to split up your lists into smaller for these reasons too, since you can micro-manage your lists and see which are worth pursuing in the long term. Then again, there’s also the first method we showed you before.
It’s generally good practice to keep your lists organized as this will make it easier to incorporate other tools.
How to Save Important Searches
Something that’s going to save you a lot of time is saving the searches themselves. After you create a search all you need to do is click on Save Search at the top-right above the list.
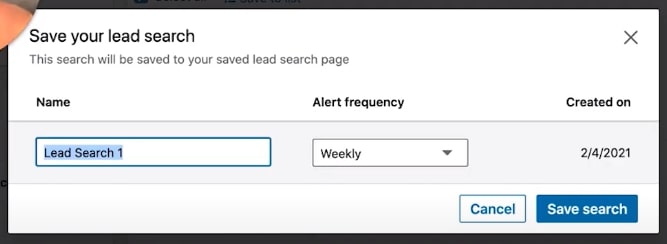
What’s really cool about this feature is that your list is automatically updated. So, if anyone on the list doesn’t fit your criteria anymore, or there are new people who do, your list will remove or add those users. You can also get notified regularly about those changes (you can choose the frequency).
To see your saved searches just click on the Saved Searches button next to the search bar.

This page is going to show you all of your saved searches, and you can view them by clicking on the list. Now, the main feature you’ll want to focus on is the New Results column. When new people are added to your search, a green number will appear. If you click the number, only the new people on your leads list will be shown. This means you can outreach only to them rather than the entire search.
SECRET TIP: How to Find (Even More) Similar Leads
There’s one final thing we’re going to show you and this will help you find more leads that are similar to your existing customers. Start by getting the name of an existing customer and typing it into the LinkedIn Sales Navigator search bar.
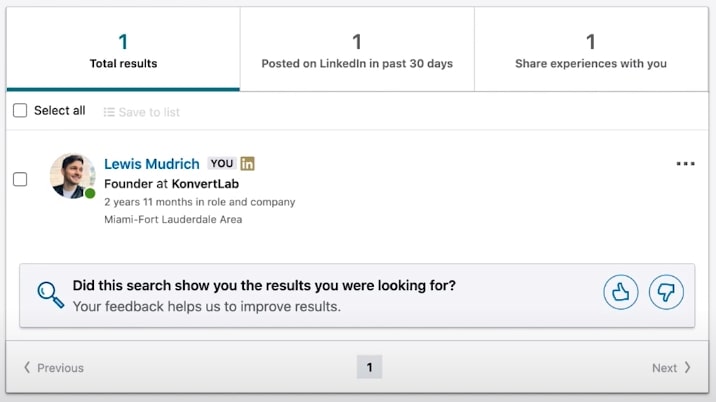
Their information should appear in the search results; in this case, we’ve chosen the KonvertLab founder. All we have to do to find people similar to him is click the dots icon on the right side, and click View Similar.
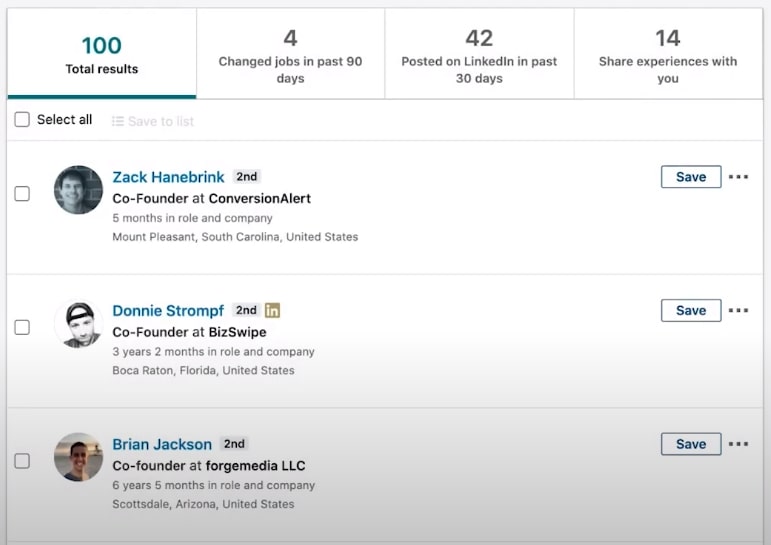
Now we have a list of 100 people who have similarities. They might have the same job title, run similar agencies, or have a similar skill set. So, if your outreach is working really well with your current customers, you can use this feature to find even more people who would engage.
Alternatively, if you don’t have any customers yet, you could try to find out who your competitors’ top customers are and use their names instead. From there, just add the results to your lead list and you can get to work with your outreach strategy.
Conclusion
Outreach, under any capacity, is challenging. Sometimes you won’t know who to target and other times you won’t be able to find enough people worth targeting. This is why we highly recommend LinkedIn Sales Navigator. It’s so flexible that you won’t have any problem getting enough leads for a successful outreach strategy.
This is also something we use for our clients and have found to get great results. We can do the same for you! Let’s discuss our methods, and what we can do to help your business succeed, on a free strategy call. Just click the button below and we’ll take it from there.

